Like the 11 day work-related trip to Japan in September this year, the preparation for this 15 day family trip was quite labor-intensive. Google Maps was heavily used and for the most part proved reliable, though there were a few timings on local bus schedules and trains that seemed off. We also used a trio of guidebooks – Japan by Rail, Fodor’s Travel, and DK Eyewitness – to plan for the trip, two of which – Fodor’s Travel and DK Eyewitness – were recently updated editions. We didn’t finally cover as many places as we would have normally in warmer weather – the very short days coupled alongside snowing and freezing temperatures at some level made all of us less enthusiastic at times to head out to further explore.
There’s a lot to cover, so this post will be in two parts – and also in part because the Excel summary sheet below would otherwise be too wide to include in a single post width. This post covers Days 01 to 07 of our itinerary, and the next will cover the rest.

Day 1 (Tokyo – Shinjuku)
Travel from Hakata Airport International Terminal to Hotel Mystays Haneda (0.15 hrs): there are many ways to get from the airport to this hotel. The option that’ll cost no money would be the hotel’s complimentary shuttle bus that does a route between the two domestic and international terminals, but it runs only during specific hours (you can check with the hotel ahead for the updated schedule). If you’re opting for this, study the bus pick-up map carefully: we were at the wrong place for the pick-up on Day 14, and ended up missing the shuttle and had to make our own way back to the hotel. The second option is the subway, which connects the terminals to Anamori-Inari station where you’ll get off and walk the remaining 6-7 minutes to the hotel. Thirdly, the cab – which will run you to around ¥1,200. There’s also the airport limousine bus that brings visitors to several hotels in the more central Tokyo districts, but we weren’t sure whether it would stop at Mystays Haneda, so can’t comment on that possible mode of hotel transfer.
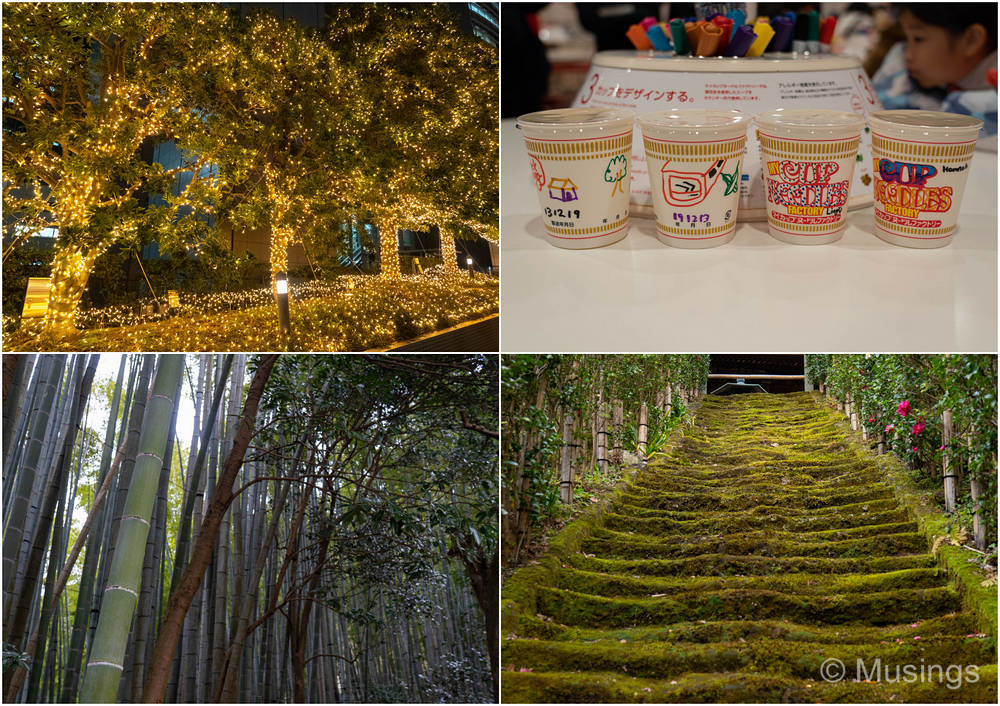
Shinjuku Winter Illumination (1 hr+) [blog posts here and here]: Shinjuku is a huge district with a lot to see and do, so the timing notes here are specifically just for the specific area I’m commenting on. There are several winter illuminations around Tokyo, with many located around the major Shinjuku and Tokyo train stations. The one we visited is fairly compact and located in Terrace City, but beautifully done-up with the prettiest lighting located along both sides of a small landscaped park.
Day 2 (Yokohama, Kamakura)
Yokohama Cup Noodle Museum (2 hrs) [blog post here]: Yokohama city (blog post here) is a short 30 minute train ride away from Anamori-Inari Station, so pretty convenient for us to get to, and the Museum itself is another 8 minute walk away. The Museum is a ball of fun, though just to be sure, you’re not literally making your own cup noodles from start to end. It’s more like decorating the cup, choosing a custom flavor and mix of condiments to throw in, then packaging it. The museum is a loving homage to the creator of instant noodles, and also all things instant noodles actually. The workshops to make your own pasta and cup noodles saw huge crowds, so you might want to be the first in the morning queue – like us – to do the workshop first, then explore the Museum at your leisure. The foodcourt on level four is loads of fun, letting you sample noodle-type cuisine from all around the world. Admission to the Museum is ¥500/adult, and each cup noodle costs ¥300.
Bamboo Grove of Hokokuji/Kamakura (1 hr+) [blog post here]: Kamakura is another quick 30 minutes away from Yokohama, and is a beautiful small city with a large number of shrines and temples. Frequent buses ply the route where several of the key places of interest are, including this Bamboo Grove. To be sure, it’s not comparable to the Bamboo Grove of Arashiyama in Kyoto in terms of size and sheer grandeur, but it’s also not nearly as crowded. Thirty minutes is sufficient if you’re optimising your time here, but an hour will really give the place justice. Admission for adults is ¥300.
Moss Stairs of Sugimoto-dera (0.15 hrs) [blog post here]: walkable from the Bamboo Grove, but also easy to miss. The entrance is on your right up a flight of steps if you’re walking from the Grove. The sight is a little unique, but also not particularly memorable either. And the ¥200 admission/adult is very high considering that there’s just one sight you’re looking at. Skip unless you have a lot of time and also money to spend.
Kamakura (2 hrs+) [blog post here]: the city centre where the train station is has numerous side-roads and a large number of little shops for you to explore. An easy way to spend the rest of the day before you head back to Tokyo.
Day 3 (Tokyo – Omiya – Shinjuku)
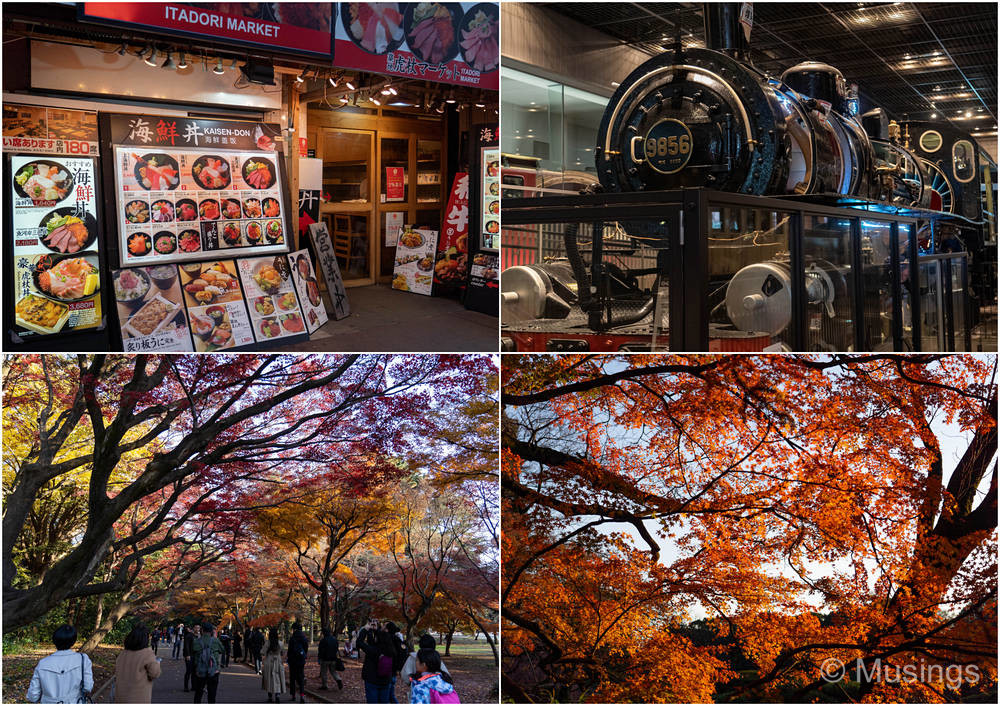
Tsukiji Outer Market (2 hrs+) [blog post here]: the first of four markets we visited on this trip. The actual famous fish wholesale market has since relocated, but the outer market that’s accessible to the public remains at the original location. The market is large, and offers hundreds of shops selling seafood, condiments, dried goods, and eateries offering snacks and restaurants whipping up fresh seafood. The kids and wife especially enjoyed the tamagoyakis (¥100) and strawberry daifukus (¥350). You can easily spend an entire morning here.
Omiya Railway Museum (3 hrs+) [blog post here]: this is like nirvana for train lovers, from the number of children-friendly rides and activities, to Rolling Stock Station, the cavernous hall that features 36 railway cars on display. We spent three hours here, and it honestly wasn’t nearly enough – allocate at least 5 hrs if you can spare the time. The miniature train driving experience where kids can drive their own train seems to be the most popular child attraction in the Museum, and queues formed very fast after opening hour. So if you’re interested in this activity, you’ll need to be among the first in the queue when the Museum opens, and run like the wind. Admission fee is ¥1,330/adult.
Shinjuku Gyoen (3 hrs+) [blog posts here and here]: the huge public park that’s about a 12 minute walk from Shinjuku Station. The park comprises three different landscaped gardens, and is one of the most popular places to view cherry blossoms during the right seasons. There’s a small admission fee of ¥200/adult. Highly recommended place to visit, and you can easily spend half a day at the park.
Day 4 (Hakone)
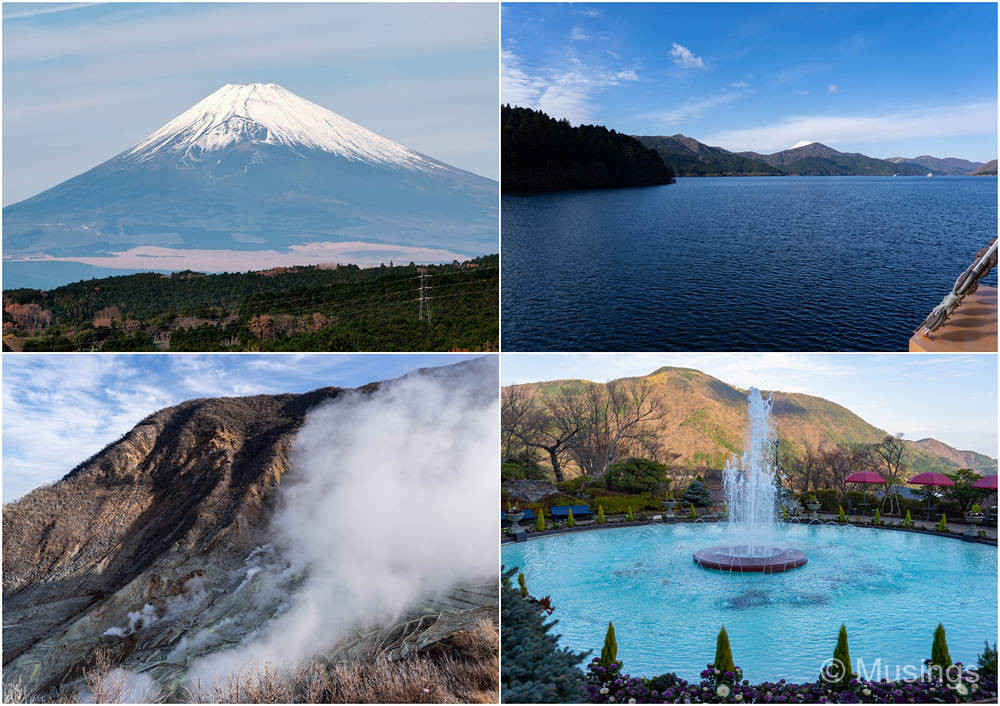
Hakone (6 hrs+) [blog post here]: Hakone is a beautiful small city, with a famous route that circles Lake Ashi. Most travelers will take a circular route in either a clockwise or anti-clockwise direction. Driving of course brings you the most flexibility in selecting the specific place of interest, e.g. to view Mt. Fuji, but you’ll need to be confident driving along mountain roads – they are well-paved thankfully but you’ll get plenty of sharp corners to navigate. Alternatively, the route is also served by several buses, and you’ll want to get the Hakone Free Pass for that. Ideally, you’ll also want to spend a night in Hakone to get the most chances of viewing Mt. Fuji on a clear day. But if that’s not doable, a full day will suffice – just check the expected weather in the forecasts and plan the day accordingly.
Hakone Shrine Torii Gate (0.5 hr+) [blog post here]: this ‘floating’ torii gate is tiny in comparison to the one at Miyajima Island (blog post from the September trip here), but it has the added advantage – or curse – of being a photographic spot where the standing space under the gate is sufficient for just a few persons at a time – half a dozen if you really push it. Be prepared to wait for your turn if you arrive during busy times – we got there in the early morning and there were half a dozen people in front of us already. And if you have those tourists who want to each do their 101 vanity poses for their Instagrams, then be prepared to wait even longer.
Mishima Skywalk (1 hr) [blog post here]: this skywalk was built specifically for the purpose of letting visitors have a more or less unobstructed view of Mt. Fuji. It’s not the best view you can get of the grand old lady of course, and from the skywalk itself, part of the foreground will be very slightly covered by rolling hills and antenna towers. Judging from what I saw from friends’ FB posts, the view of the mountain is even more picturesque from Lake Kawaguchiko. Though from what I also read, trying to take photos of the mountain from that area is even more subject to the vagaries of weather. Admission is ¥1,000/adult.
Lake Ashi Sightseeing Cruise (1 hr) [blog post here]: the lake is served by a number of 18th century-styled wooden ships that cruise around a circular route within the lake. The ship exteriors are just facades though – these ships are modern with all the comforts and trimmings of 20th century passenger ferries. The ship we were on – the Victory – had a number of decks to suit your fancy: mostly internal, and two top-level decks if you’d like to be on the outside. The waters were very calm during our cruise around the lake, so there were no problems with seasickness at all. There are also spots in the cruise where you can spot Mt. Fuji more intimately, though there will be some obstruction in the form of foreground hills. Admission is already included if you’ve opted for the 2 Day Hakone Free Pass.
Hakone Ropeway (0.5 hrs) [blog post here]: we got off the ferry at Togendai, lunched, and got on the ropeway. The ropeway from Togendai to Ubako will net you again some opportunities to take pictures of Mt. Fuji, though you’ll be necessarily shooting through the glass windows of the ropeway car. We got off at Ubako station to check out a viewing spot where we’d purportedly get another fabulous view of Mt. Fuji that the ropeway car PA system mentioned – but we went on a trail instead when the viewing spot was actually inside the ropeway station itself. Still, it was good exercise for the legs after a hearty lunch!
Owakudani Volcanic Valley (1 hr+) [blog post here]: accessible from the Hakone Ropeway – basically, you get off at the Owakudani station. The valley itself is another couple of minutes’ walk – you can’t miss it. If you’re volcano-phobic or just don’t particularly want to get too near the vents, e.g. because you’re asthmatic, there are still numerous points right outside the station for you to get a good look at the vents. Try to get back on the ropeway station in the direction of Sounzan station as you’ll get even better views of the valley.
Gora Park (1 hr+) [blog post here]: this spot wasn’t on our original itinerary, but the opportunity to check it out came up after several transportation systems were down for maintenance in Hakone – and we’re glad we spent an hour here. The park is small and also sits on a slope that goes downwards from the entrance – but flora lovers will have plenty to see here, including the small greenhouse towards the far end of the park.
Day 5 (Sapporo)
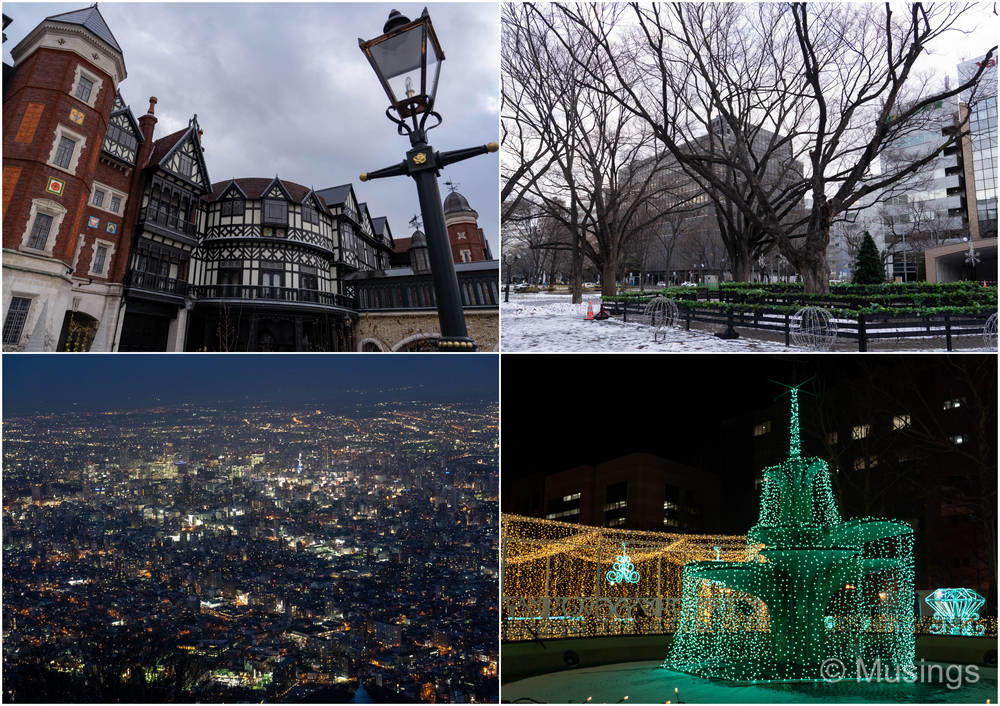
Shirokoibito Park (1 hr+) [blog post here]: the outside park with the Tudor-styled buildings is free to enter, and you could easily spend up to an hour taking pictures at the various colorful buildings and exhibits. There’s also a museum and gift shop inside the buildings, but the Ishiya chocolate factory itself requires a separate admission fee of ¥600/adult. Workshops cost extra too.
Odori Park (1 hr+) [blog post here]: the very long and somewhat narrow park that stretches out from the station with its namesake. Not much to see in winter during the daytime, but the place comes alive with its winter illumination and festivals at night. Blog post on the winter illumination light-up here.
Mt. Moiwa (1 hr+): [blog post here]: the mountain is accessible via ropeway and two different car systems, and is considered one of the three best places to view a Japanese city from evening onwards. I had mixed feelings about the perspective: it’s pretty yes, but the lack of distinguishing natural features makes the night view of the city, well, finally bland. The observation area can get crowded, but it’s not nearly as bad as Mt. Hakodate on account that the platform wraps around the entrance, and there are different things to see all around. Round-trip ropeway fee is ¥1,700/adult.
Day 6 (Asahikawa)
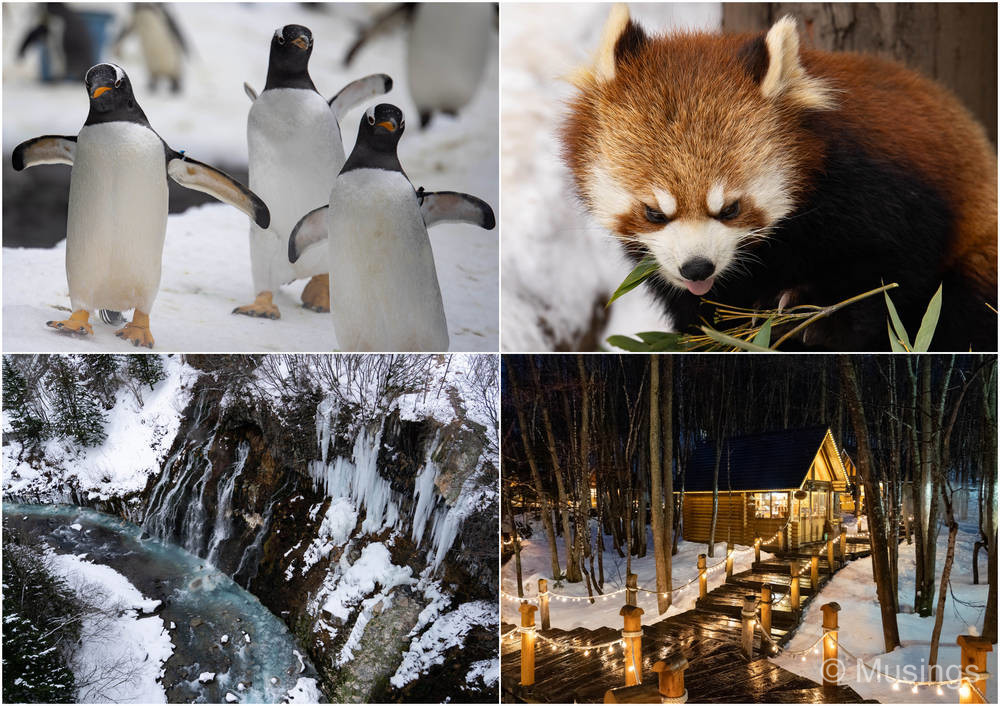
Asahiyama Zoo (3 hrs+) [blog post here and here]: most people making their way to this popular zoo will do so via a tour bus, as the Asahikawa station where a train will bring you to isn’t actually anywhere near the zoo – about 11 km away in fact. However, the bus tour itself might allocate insufficient time to the zoo: we had just two hours, and that’s not nearly enough. Even in winter season with a number of enclosures closed, you’d need at least three hours to fully explore the rest of the park. The penguin feeding session/penguin walk were extremely popular, but because of the fairly small viewing area and the crowds, it was impossible to see anything – so get there extra early if you absolutely do not want to miss the session. Whether the penguins will do the walk too depends on the amount of snowfall, but it shouldn’t be a problem if you’re visiting in the thick of winter. The tour bus package will typically include admission to the zoo. If not, it’s ¥820/adult.
Shirahige Falls (1 hr) [blog post here]: breathtaking cascading waterfalls that you can observe from a bridge. Free admission as far as I can tell. Try to spend at least 30 minutes here, and an hour if possible so that you can fully walk the length of the bridge and have time to really soak in the grandeur of the sight. Tripadvisor reviewers note that there are insects about during warmer weather that can be seriously annoying, but there were none during our winter visit.
Ningle Terrace (2 hrs+) [blog post here]: very pretty tourist attraction comprising dozens of wooden cottages lit up in Christmas winter fashion. Each cottage is a small shop or cafe offering a range of handicraft, souvenirs, or luxury items. The planked walkway isn’t wide, and with the usual crowds who insist on stopping at every juncture for their vanity poses, the place can feel crowded real fast – so go in prepared.
Day 7 (Sapporo)
Nijo Market (0.5 hrs) [blog post here]: the second of the four markets we checked out, and also about as small as Sankaku Market – with the difference being Nijo Market sits by a main road and feels ordinary, while Sankaku Market is in a slightly sloped alleyway and covered overhead from the elements, i.e. cosy. You’d easily do better by visiting any other seafood and fresh produce market rather than this one.
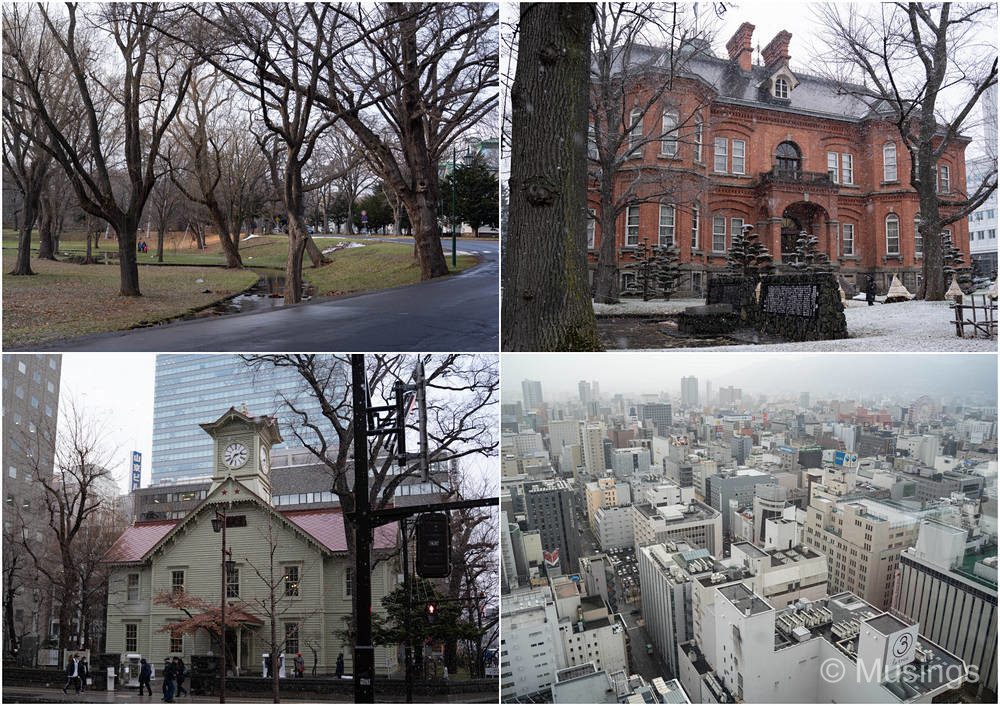
Hokkaido University and Museum (3 hrs+) [blog post here]: huge university grounds and park that is free for the public to enter. The Museum is a wonderful showcase of the university’s history and various disciplines, and as an educator, I really enjoyed looking at the student project showcases. No admission fee required – hooray!
Former Hokkaido Government Office (0.5 hr) [blog post here]: a red-bricked mansion-like building, an exemplar of American neo-baroque architecture. The mansion was closed for renovation, but you can still explore the outside of it. The building looked incredible against snowfall, and I managed to get some awesome pictures of it.
Sapporo Clock Tower (0.5 hr) [blog post here]: small clock tower that was built in 1878, with the clock itself purchased from Boston in 1881. Admission fee is ¥200/adult – low enough, but we didn’t go inside to take a look.
Sapporo TV Tower (1 hr) [blog post here]: one of the best places to get a look at Sapporo from above. The TV tower has the advantage of being on one end of Odori Park, which means that one of the four cardinal directions – facing westwards – will net you a fabulous view of the entire length of the park, and possibly even incredible pictures at golden hour (though we didn’t stay till sunset). Admission fee is ¥720/adult.
Continued in the next post which will cover Days 08 to 15!
Recent comments