This has been our longest family vacation at 18 days, and it was a rare opportunity for us to be able to take such a long holiday. The vacation went remarkably well: we were able to hit most of our planned itinerary. I judge our completion rate at around 90%, a better rate compared to last year’s trip to Kansai. The places of stay we decided on were invariably at least minimally decent, with some really good ones — Toggle Hotel Suidobashi and Stay Nikko Guesthouse being particularly solid — and we didn’t miss any of our connecting trains.
Still, with the benefit of hindsight, our itinerary could have been further improved. Our notes summarising our experiences and reflections of each major place we checked out this trip! This will be a very long post, so it’s split into two parts. This first part below covers Days 01 to 08.
Day 1 (Tokyo – Kawaguchiko)
Travel from Narita International Airport to Kawaguchiko (3 hrs): our initial fears over the time it’d take for us to clear immigration and collect our baggage were unfounded. We quickly cleared all airport procedures in about an hour, then took another 5 minutes to forward the larger of our two luggage cases to our Kawaguchiko hotel. We took the Skyliner from Narita to Nippori Station, then another short train ride to Shinjuku Station. From there, we hustled over to the adjoining Shinjuku bus terminal for the express bus to Kawaguchiko. Once at the station, we easily found sufficiently large lockers for our second luggage case, deposited it there, and headed to the first spot.
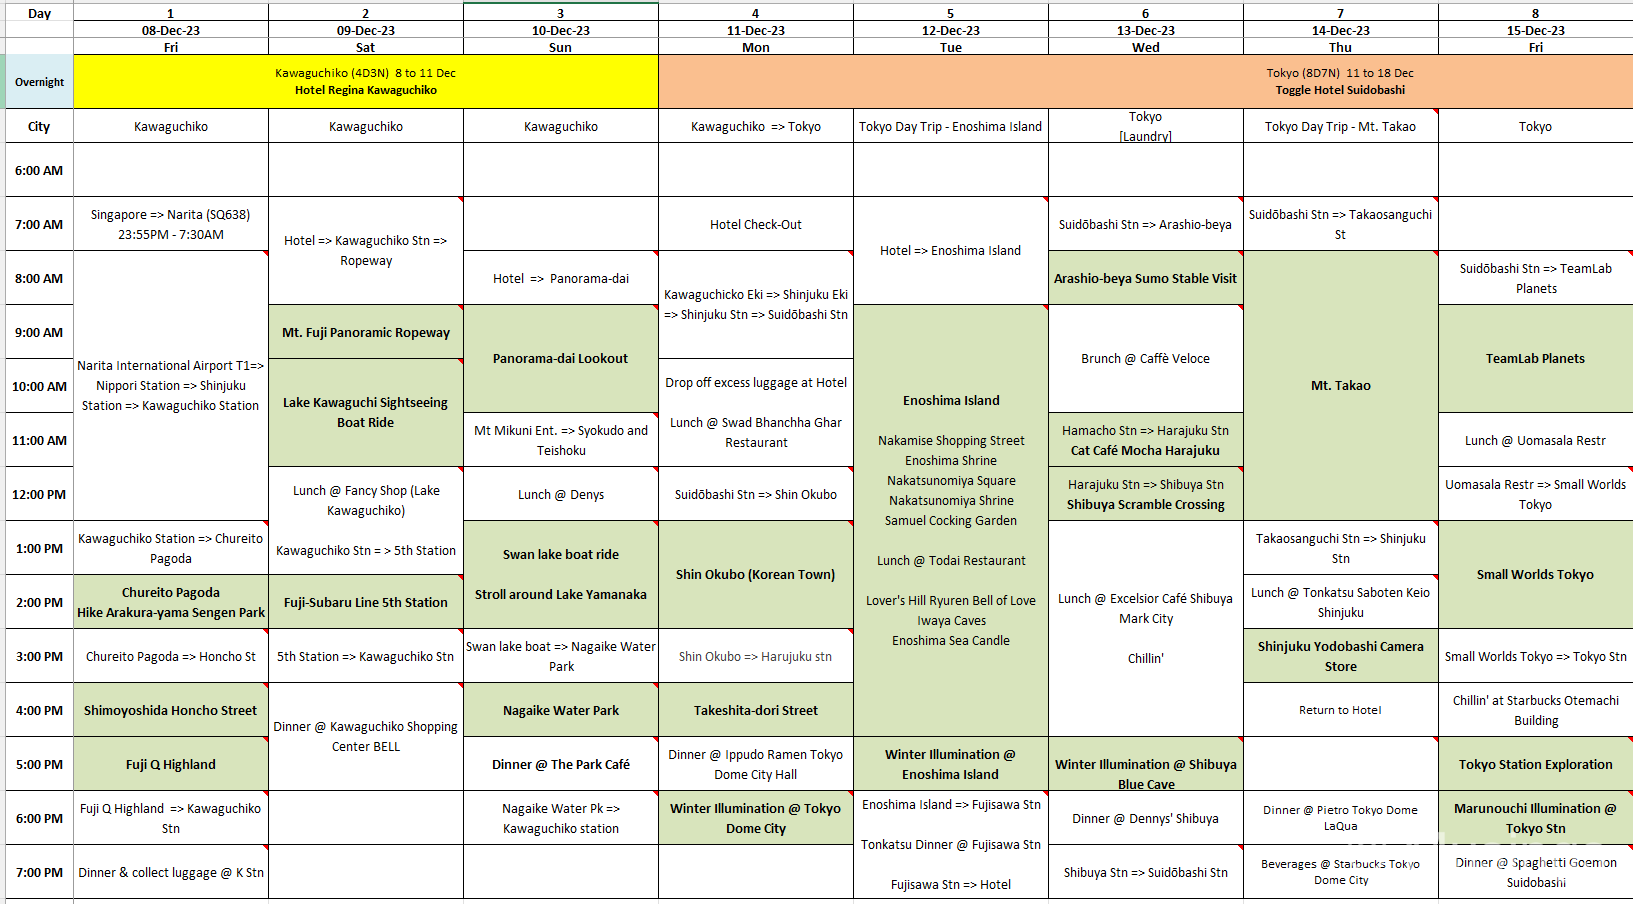
Chureito Pagoda (1 hr) [blog post here]: we reached Arakura-yama Sengen Park in good time from Kawaguchiko Station. The hike up was a different matter though — what with the several hundred steps in the pretty steep climb! The observation platform was pretty crowded, but aside from the persons who were hanging around to take pictures of the coming sunset, most visitors were content to take some pictures and then head back down. Pro-Tip: Mt. Fuji looks best from this location in the morning. The mid-afternoon we were there showed particularly harsh lighting, with the sun towards the right and in front of the observation platform. This made taking nice pictures really difficult.
Shimoyoshida Honcho Street (0.5 hrs) [blog post here]: from Arakura-yama Sengen Park, it was another short bus ride to Honcho Street to get those iconic pictures of a small town with Mt. Fuji in the background. There is a popular spot for photo-taking — just follow where the crowd is going. You’d need to employ common sense though: the number of vehicles going through the street isn’t infrequent at peak hours, and they are not moving at exactly snail speeds. Visitors need to comply with the instructions that the traffic marshals provide. Pro-Tip: you can walk further uphill down the street for a slightly different perspective. Either way, you need to employ photo compression to get the necessary visual effect: smartphone cameras with 3X zoom should suffice, or better still, an interchangeable lens camera with a travel zoom lens that starts from at least 70mm.
Fuji Q Highland (1 hr) [blog post here]: it was pretty late in the evening already, but the Mt. Fuji 3 Day Pass we’d picked up had one complimentary ride included at Fuji Q Highland, so we went for it. The park has a number of rides, including several for thrill-seekers, and the close-to-end-of-day timing we went meant there weren’t long queues. You could consider spending a couple of hours in this park if you’d arrived earlier and had time to spare.
Day 2 (Kawaguchiko)
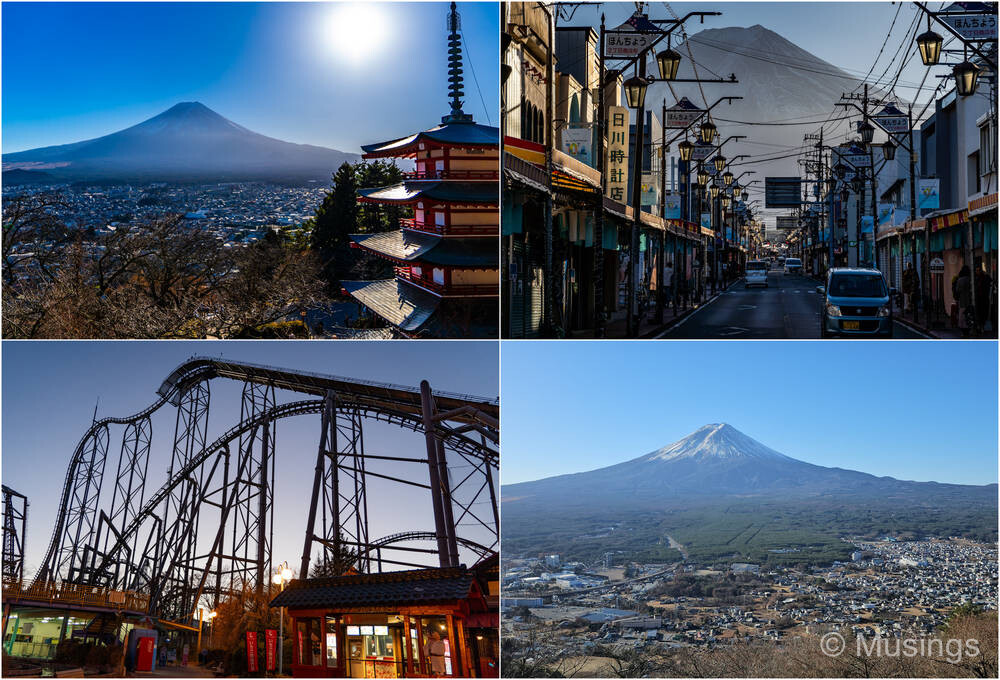
Mt. Fuji Panoramic Ropeway (1 hr) [blog post here]: the observation deck is accessed by the ropeway opposite Lake Kawaguchi, and it offers a clear view of Mt. Fuji on a good day, with the built-up areas in the foreground. There are a couple of viewing points: the deck itself, the rooftop deck of the souvenir and food outlet, and also a swing that sits on a small hill that you can walk to in about a minute. The swing is a paid ride, but it seems to offer a view from the highest elevation in this area. The direction of the sun wasn’t perfect though: it was in front and on the left, which might cast harsh shadows depending on the angle of your shot. You’d likely spend perhaps 30 minutes at this observation deck before heading down.
Pro-Tip: queues form fast, and by the time we left the area at noon, the queues had snaked down to the main road. So you have a difficult decision to make: if you go early in the morning, you likely won’t have to waste time in queues — but this might come at the expense of lighting conditions for photos.
Lake Kawaguchi Sightseeing Boat Ride (30 minutes) [blog post here]: the boat ride is a lot of fun. It does a loop around the lake, and if your boat is uncrowded, it’d be easy to move to the port side first to get pictures of Mt. Fuji from the lake itself, then pivot to the starboard side for more of the same as the boat completes the loop. Pro-Tip: the view from either side is the same, so don’t feel like you’re missing out if you choose not to shift from your comfortable seat.
Fuji-Subaru Line 5th Station (2 hrs) [blog post here]: the 5th Station sits about two-thirds up Mt. Fuji, and is the easiest way for you to get a close-up look at the snow-tipped peak of the mountain without actually making a climb. There is a large souvenir and F&B shop at the 5th Station that sells items at considerably marked-up prices. The station area is pretty big, and there is a viewing deck behind the souvenir shop where you can get great views of the mountain peak. Pro-Tip: take note of the timing of the last departing bus, and join the queue early if needed — this is not a place you want to be stuck at!
Day 3 (Kawaguchiko)
Panorama-dai Lookout (2 hrs) [blog post here]: the lookout sits around Lake Yamanaka and isn’t on the route of most tour buses. Most visitors would either drive up — which would make getting to the lookout point quick and painless — or do the slightly silly thing like we did: take a bus from Kawaguchiko to the Yamanaka side, then hike the trail that includes a very steep segment towards the end. To clarify: the trail itself isn’t particularly interesting. The payoff, however, is unquestionable: you get a wide panoramic view of Mt. Fuji and the lakes area.
Lake Yamanaka (3 hrs+) [blog post here]: the highlight of our Day 03 turned out to be the relaxing afternoon we spent around Lake Yamanaka. The area is pretty lifeless at night, but wonderfully scenic and peaceful during the day. Again, the place isn’t the easiest to get to and isn’t on most people’s radar when they visit Kawaguchiko. We recommend taking the lake pedal boats, if nothing else to feed the swans. Pro-Tip: take careful note of which provider and jetty you rowed out from — the jetties look alike!
Nagaike Water Park (0.5 hrs) [blog post here]: this was a spot that looked good on paper but turned out to be less interesting in actuality. You do get to take great pictures of Mt. Fuji from across the lake, but that’s about it. Also, don’t be like us: if you’re visiting this spot in the late afternoon and taking public transport, make sure you do not miss the last bus!
Day 4 (Kawaguchiko – Tokyo)
Shin Okubo (2 hrs) [blog post here]: this spot was included largely for our daughter, she being the big K-Pop fan. The street has a huge number of shops that sell Korean cuisine, including sit-down restaurant-type fare and snacks. There are also shops aplenty selling all manner of K-Pop group merchandise, including what looks like not very authentic ones occasionally!
Takeshita-dori Street (1 hr) [blog post here]: this was one mega-crowded street for all things hip and modern. Fashionistas would love the place. Us, not so much — and we largely visited just to see what the fuss was about.
Tokyo Dome City and Winter Illumination (1 hr) [blog post here]: this huge sports, entertainment and retail complex was just a five-minute walk across the road from our stay in Tokyo, Toggle Hotel Suidobashi. It was uncrowded, had a beautiful atrium with a musical fountain, and in the evenings the towering Ferris wheel and roller-coaster rides make for great photo backdrops.

Day 5 (Enoshima Island)
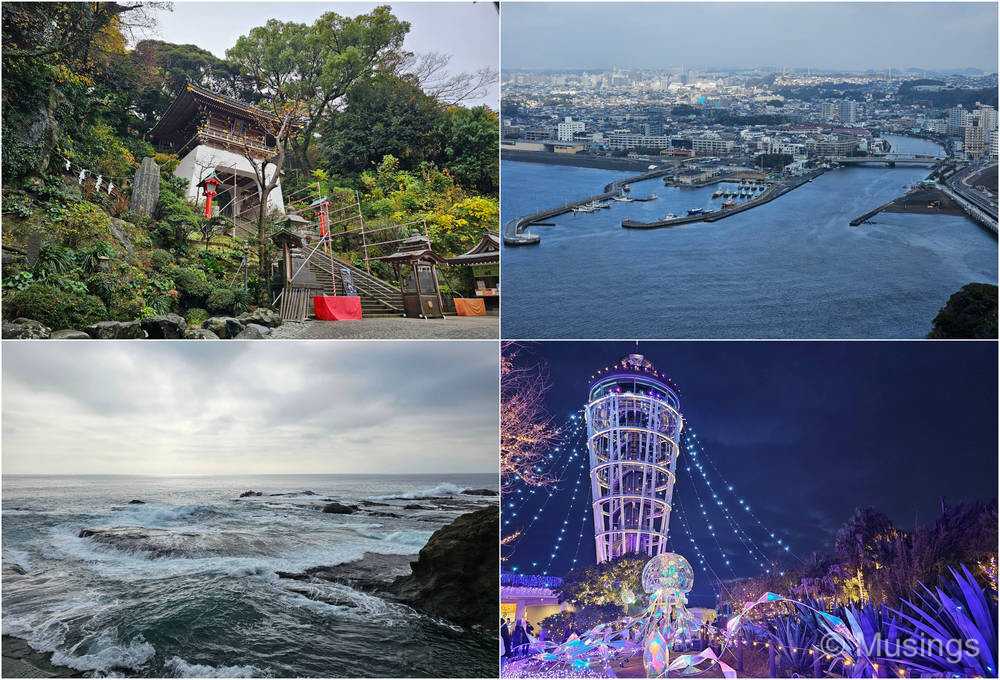
Enoshima Island (whole day) [blog post here]: we spent an entire day here and stayed till early evening for the winter illumination light-up, and it was worth the time. The island is pretty easy to get to from Tokyo. Pro-Tip: unless comfort is everything to you, skip the escalators and take the stairs — they’re manageable and save you some money.
Samuel Cocking Garden (0.5 hrs) [blog post here]: the garden in winter is pretty drab — not much flora to see. There are a couple of cafes and viewing decks though that provide nice views of the mainland.
Sea Candle (0.5 hrs) [blog post here]: the view from the tower is fantastic. We went up twice — once in the morning and once at sunset.
Iwaya Caves (1 hr) [blog post here]: the cave system is small, but Cave 2 with its winter illumination light-up was stunningly beautiful.
Winter Illumination (1 hr): Pro-Tip: you absolutely must stay for the winter illumination! Of the five winter light-ups we saw this trip, this was by far the most visually stunning.
Day 6 (Tokyo – Harajuku and Shibuya)
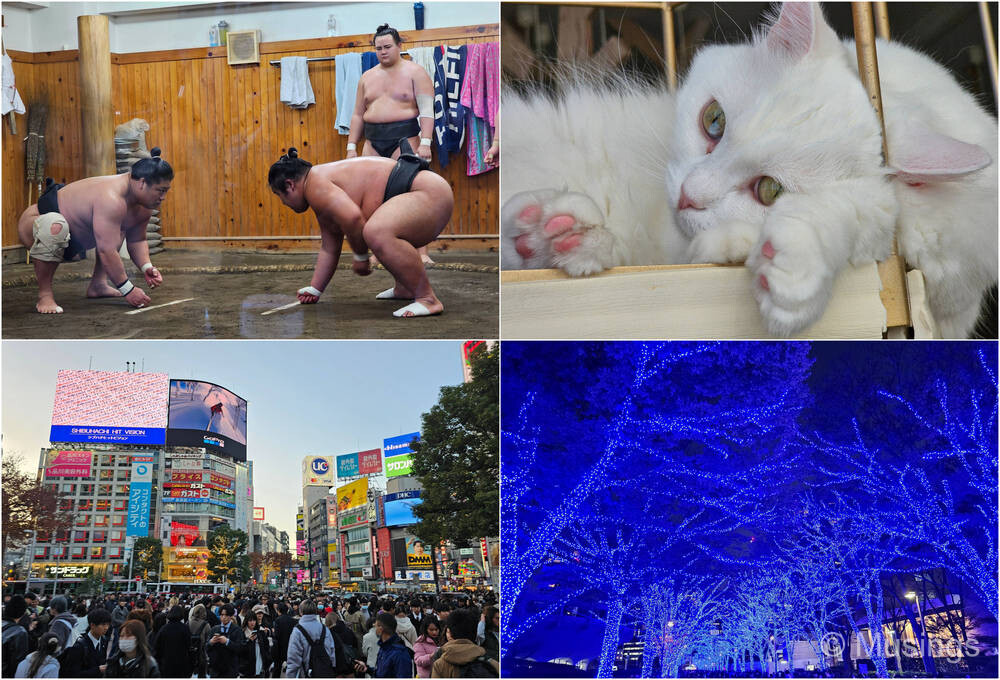
Arashio-beya Sumo Stable (1 hr): we opted for the free viewing option — observing the training through a window — instead of paying for a private tour.
Cat Cafe Mocha Harajuku (1 hr): the cafe offered a wide range of complimentary beverages which kept the adults happy while the kids played with the cats.
Shibuya Scramble Crossing (0.5 hrs): one of those things you just have to see for yourself. The nearby Hachikō Memorial Statue is also worth a quick photo stop.
Shibuya Blue Cave Winter Illumination (0.5 hrs): widely praised, but we personally didn’t find it that interesting compared to Enoshima’s light-up.
Day 7 (Mt. Takao and Shinjuku)
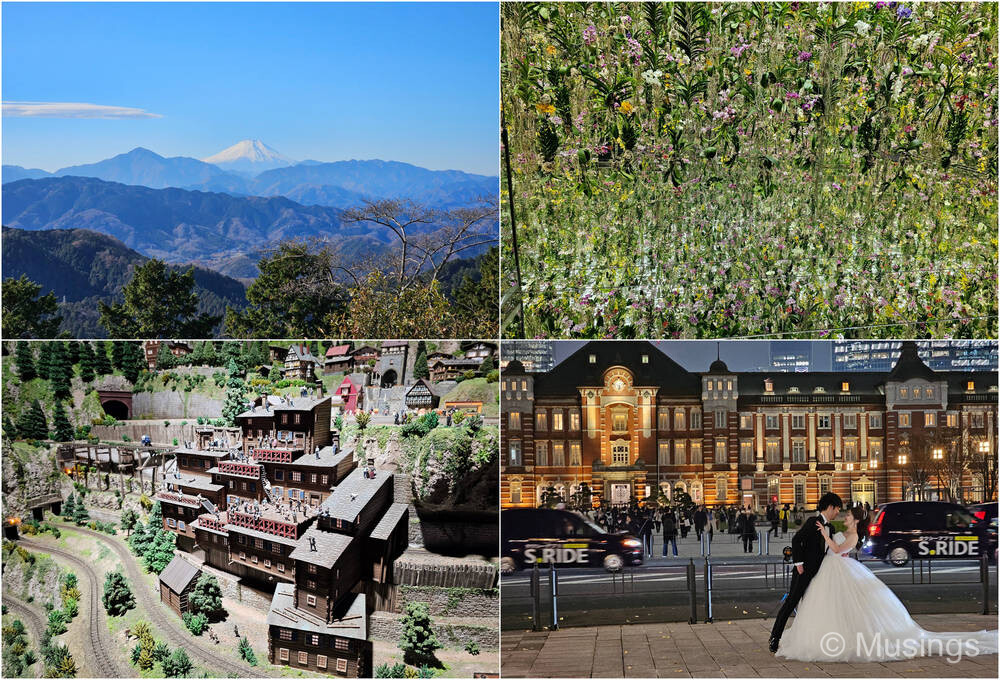
Mt. Takao (3 hrs+): an easy half-day trip from Tokyo with good views of Mt. Fuji on a clear day. Pro-Tip: keep the visit flexible and go when the sky is clear.
Shinjuku (3 hrs+): there is a lot to see and explore here, and we only scratched the surface.
Day 8 (Tokyo)
TeamLab Planets (1 hr+): this interactive museum is a must-visit. Just make sure your camera gear is well secured — you definitely don’t want to drop it into the water installations!
Small Worlds Tokyo (2 hrs+): impressive miniatures, but it didn’t quite match the wow-factor of TeamLab Planets.
Tokyo Station and Marunouchi Winter Illumination (1 hr+): a beautiful and iconic area of Tokyo with elegant architecture and a pleasant winter illumination display.
Part 2 that covers Days 09 to 18 continues in the next post!
Recent comments