Back several years ago when I had the Nikon D300, I shot in RAW almost exclusively. A lot of picture-taking back then was at travel, landscape sights and the like – and the pictures typically had wide dynamic ranges which required post-processing work to lift out details that would had been lost if I’d shot in JPG. I’ve done a post here before on what image editing tools can do to retrieve detail. Since our two children though, I’ve found myself shooting in JPG modes more often, if for no other reason than that post-processing work with RAW images is just too time-consuming!
More recently I’ve started returning back to shooting in RAW again on the E-M5 and E-PL6, and typically to compensate for oversights when fishing out the camera quickly to capture candid shots is more important than fiddling around with the camera’s settings to ensure I’ve configured it correctly. I’m not a Photoshop expert by any stretch of imagination, but the two pictures below again show how useful is it to shoot in RAW modes.
The first pair of pictures below is of Hannah in an NTUC Fairprice trolley cart after dinner at Hougang One on Saturday evening. The rest of the images in the series were metered correctly, but the one below wasn’t for some reason. Possibly an E-M5 quirk. Hannah looked a little too tanned – she’s quite fair-skinned, and the aisle at the supermarket was quite brightly lit.

The image was corrected in Photoshop’s RAW editor, with basically just a +0.85 ev adjustment.

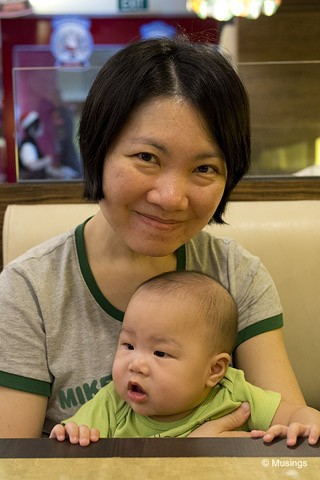
Another common correction I’ve been making is white balance. Color balance is typically very difficult to correct in JPG once the image is taken, and I’ve made it a habit to always shoot in RAW when I’m working in warm lighting (especially in restaurants), or in settings with presence of intense primary colors – a couple of the Minton pictures especially come to mind on this. I do have a White Balance card lying at the bottom of my camera bag to custom set WB, and there’s also the preadjusted temperature setting for warm lighting of around 3000K on the E-M5. Still; an example follows: below is a picture taken this morning over brunch at Swensen’s @ Compass Point.

Ironically, the unaltered image above is a closer representation of the scene as seen in person – the lighting at Swensen’s is very warm. But it also gives both Ling and Peter overly intense skin colors. Adjusted image with corrections to exposure, tint and most importantly, temperature:
Unfortunately, every image has to be separately adjusted. Just too much work! Probably time for me to finally invest in an updated copy of Lightroom.
Hi CY,
Photo-editing on both Lightroom and Photoshop are time-consuming. Is there a special shortcut on Lightroom? I first started with Lightroom, but I use more on Photoshop now. I’m still a newbie, looking for short courses on Photoshop if time permits.
The dynamic range of camera sensors these days is so great that I just can’t bring myself to forgo shooting RAW. I can’t help but fear that I may irrevocably lose or miss something that would otherwise be recoverable. In fact, one of the joys I experienced when first acquainting myself with my Nikon D800 was deliberately underexposing images to test the limits of shadow recovery through post-processing the RAWs. The post-processing does become a chore, but occasionally I find that I enjoy it as much as taking the photograph in the first place.
Hi Emily; well, I haven’t played with Lightroom that much – but Matt here should have a lot – but one feature of it is batch editing. One could make similar corrections to a whole bunch of pictures, e.g. changing color balance for a group of pictures taken using the same lighting conditions – rather than adjusting each image separately in Photoshop.
I’m not a Photoshop expert either, but have found that learning how to use just Adobe Camera Raw is more than sufficient for me to correct exposure anomalies.
Blessed birthday, Matt! :D
Thanks, Ling! I actually just returned from a bit of a picture-taking stroll in the fields below my house. All this discussion about photography reminded me that I hadn’t taken a single picture in over a month, so I arranged to receive a Zeiss manual-focus lens for the week of my birthday. The weather has remained somewhat decent, but my hands got awfully cold constantly handling the metal lens as I fiddled with acquiring focus. Haha!
Re: Adobe Camera Raw, I find it so useful that I don’t even bother with Lightroom these days. I use ACR to correct the exposure and any chromatic aberrations that may be evident, and then play in Photoshop to get the final result.
Happy birthday too, bud.=)